apacheやっつけ設定
CentOS 7.2, Apache2.4.6
【httpd.conf】
- ServerAdmin にメールアドレスを書いておく
- /var/www/html以外で「Require all granted」 となっているところがあったら一旦全部コメントアウト
- /で 「Require all denied」 が設定されていることを確認
- ディレクトリリスティング機能を無効化するために Options の Indexes を全削除
- 「AllowOverride None」 を確認
- トレースメソッドの無効化 「TraceEnable off」を書き込む
- クリックジャッキング対策 以下2行を書き込む
1行目はロード済みなら不要(/conf.modules.d/00-base.confを確認)
LoadModule headers_module modules/mod_headers.so
Header append X-FRAME-OPTIONS "SAMEORIGIN"
- サーバー情報表示の無効化 以下2行を書き込む
ServerTokens ProductOnly
ServerSignature off
- 403の偽装 以下2行を書き込む
(wiresharkとかのパケットキャプチャからはバレるので気休め程度)
ErrorDocument 403 "Mot Found"
ErrorDocument 404 "Not Found"
- 403の偽装 phpが使えるならヘッダも偽装
端末で
sudo mkdir /var/www/html/error
echo '<?php header("HTTP", true, 404);print("Not Found");' | sudo tee /var/www/html/error/error.php
実行後以下を書き込む
<Directory "/var/www/html/error">
    AllowOverride None
    Require all granted
</Directory>
ErrorDocument 403 /error/error.php
ErrorDocument 404 /error/error.php
【php.ini】
【conf.d以下について】
autoindex.conf
ディレクトリリスティングの見栄えを良くするコンフィグ
使わないなら削除か拡張子のリネーム推奨userdir.conf
Linuxユーザーのディレクトリをwebに公開できる
UserDir disabled を確認する
使わないなら削除か拡張子のリネーム推奨welcome.conf
インストール直後にルートディレクトリを表示させると出てくるあれの設定
コメントアウトするとあれが表示されなくなる
使わないなら削除か拡張子のリネーム推奨php.conf
特に変更不要?phpMyAdmin.conf zabbix.conf などのwebインターフェースの.conf
それぞれのwebインターフェースに関わる.conf
必ずRequireで信頼するホストのみの設定ができているか確認すること
iptablesのノリでfirewalldをつかう
サーバー周りとかむりぃ...
しかもファイアウォールなんかfirewalldに変わってから触ったことないしむりぃ...
とか思いながら,RadHatカスタマーポータルの「4.5.14.6. ダイレクトインターフェイスの使用」を見てたら,iptablesみたいな使い方できるっぽいことを知る.
直接INPUTチェインに書き込んでいいのか迷ったが,特に触ってない状態からiptables -vLしてみると
Chain INPUT (policy ACCEPT 0 packets, 0 bytes)
 pkts bytes target     prot opt in     out     source               destination
29509 2095K ACCEPT     all  --  any    any     anywhere             anywhere             ctstate RELATED,ESTABLISHED
 2676  161K ACCEPT     all  --  lo     any     anywhere             anywhere
    0     0 INPUT_direct  all  --  any    any     anywhere             anywhere
   36  7146 INPUT_ZONES_SOURCE  all  --  any    any     anywhere             anywhere
   36  7146 INPUT_ZONES  all  --  any    any     anywhere             anywhere
    0     0 ACCEPT     icmp --  any    any     anywhere             anywhere
   36  7146 REJECT     all  --  any    any     anywhere             anywhere             reject-with icmp-host-prohibited
INPUT_directといういかにもそれらしいチェインがある.
man firewalld.directを参考にして, 試しに/etc/firewalld/direct.xmlにローカルからssh,http,httpsへのアクセスを許可するルールを書き込んでみる.
<?xml version="1.0" ?>
<direct>
    <rule chain="INPUT_direct" ipv="ipv4" priority="1" table="filter">-i enp0s25 -s 192.168.24.128/25 -p tcp --dport 22 -m state --state NEW -j ACCEPT</rule>
    <rule chain="INPUT_direct" ipv="ipv4" priority="1" table="filter">-i enp0s25 -s 192.168.24.128/25 -p tcp --dport 80 -m state --state NEW -j ACCEPT</rule>
    <rule chain="INPUT_direct" ipv="ipv4" priority="1" table="filter">-i enp0s25 -s 192.168.24.128/25 -p tcp --dport 443 -m state --state NEW -j ACCEPT</rule>
</direct>
テーブル,IPのバージョン,ルールの追加先をxmlの属性で指定するようになったのと,優先度を設定できるようになったことぐらいがiptablesコマンドで設定してた時との違いで,あとはルールをガリガリ書いていって,リロードする.
iptables -vL する
Chain INPUT_direct (1 references)
 pkts bytes target     prot opt in     out     source               destination
    1    60 ACCEPT     tcp  --  enp0s25 any     192.168.24.128/25    anywhere             tcp dpt:ssh state NEW
    0     0 ACCEPT     tcp  --  enp0s25 any     192.168.24.128/25    anywhere             tcp dpt:http state NEW
    0     0 ACCEPT     tcp  --  enp0s25 any     192.168.24.128/25    anywhere             tcp dpt:https state NEW
できたけど,全くfirewalldの機能を生かしてない...
ほんとにこんなのでいいのか...とおもいながらも楽する方向でおしまい。
zabbixインストールでテーブルを作成するときの注意
(pythonの)fabricでzabbixのインストールをしようとして
# データベース初期設定
path_to_init_sql = "/usr/share/doc/zabbix-server-mysql-*/create/"
for file_name in ["data.sql", "schema.sql", "images.sql", ]:
    run("mysql -u root -p zabbix < "+path_to_init_sql+file_name)
みたいなデータベース初期設定部分のコード書いたら
[192.168.24.201] Executing task 'provisioning.server.zabbix'
[192.168.24.201] run: mysql -u root -p zabbix < /usr/share/doc/zabbix-server-mysql-*/create/data.sql
[192.168.24.201] out: Enter password:
[192.168.24.201] out: ERROR 1146 (42S02) at line 2: Table 'zabbix.hosts' doesn't exist
[192.168.24.201] out:
テーブルがない.
"schema.sql"にテーブル情報を全部詰め込んでいるみたいなので.
# データベース初期設定
path_to_init_sql = "/usr/share/doc/zabbix-server-mysql-*/create/"
for file_name in ["schema.sql", "images.sql", "data.sql", ]:
    run("mysql -u root -p zabbix < "+path_to_init_sql+file_name)
schema.sql → images.sql → data.sqlの順でインポートを行いましょう.
ちなみにschema.sql → data.sqlだとdata,sqlのインポート時に
[192.168.24.201] run: mysql -u root -p zabbix < /usr/share/doc/zabbix-server-mysql-*/create/data.sql
[192.168.24.201] out: Enter password:
[192.168.24.201] out: ERROR 1452 (23000) at line 2989: Cannot add or update a child row: a foreign key constraint fails (`zabbix`.`sysmaps_elements`, CONSTRAINT `c_sysmaps_elements_2` FOREIGN KEY (`iconid_off`) REFERENCES `images` (`imageid`))
[192.168.24.201] out:
解説サイトのとおりの順番でやらなかったせいでちょっと悩んだ話。
Amazonアソシエイトに登録してはてなブログに貼り付けるまで
広告収入で月に1回宅配ピザを食べたいです。 画像投稿の練習も兼ねて。
まず、管理画面の「アカウント設定」から項目「Amazon アソシエイトID」の「変更する」をクリック。

こんな画面にとびます。項目「Amazon アソシエイトID」の「取得方法」をクリック。

つぎはこんな画面にとびます。「Amazonアソシエイト・プログラムのアカウントを取得する」をクリック。
 Amazonアソシエイトのページに飛びます。無料アカウント作成をクリック。しばらくは指示通りに入力欄を埋めていく。
 Amazonの買い物の方でログインしていたら、住所入力はすぐ終わります。
途中でWebサイトの登録欄が出るので、忘れずにブログのURLをコピペする。

最後に電話のPIN認証がある。自動応対なので僕みたいに話すの怖いよとビビる必要はないです。
コレが終わると下のような画面になる。赤で塗りつぶしているところにアソシエイトIDがでるので、
あとで2枚目の画像のAmazon アソシエイトID入力欄にコピペする。
 このあと「支払い方法を今指定する」をクリックして、ギフト券なり銀行振込なり設定。
その入力も終わるとアソシエイトのユーザー画面に入る。一段落つく。
次はバナーの貼付け。
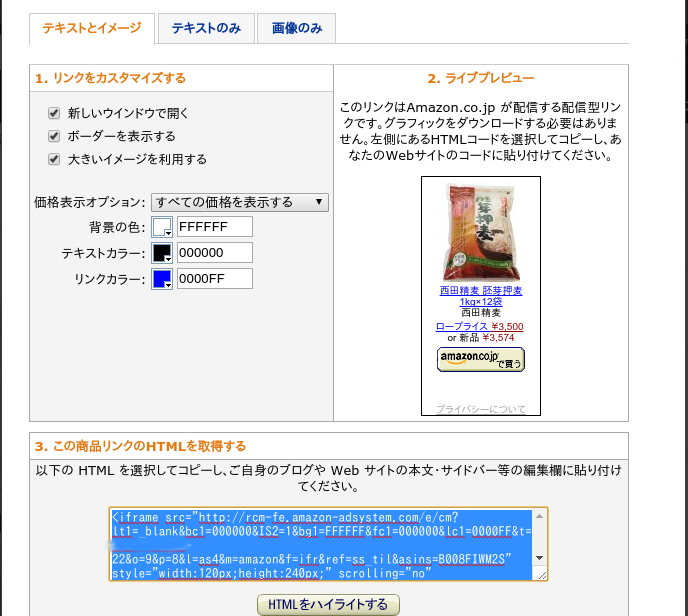
Amazonで商品を見ると、上にバナーが増えていて、「このページへのリンクを作成する」というボタンがあるのでクリック。

するとこんなポップアップが表示されるので、HTMLをコピペして。

ブログに貼り付ける。
やすいよ!おいしいよ!たまごかけごはんみたいに汁っぽいものと相性いいよ!
(申し訳程度の宣伝)
gensimのLdaModel実行時に「too few updates ~」 と怒られた時
投稿の練習,昨日Qiitaで書いたやつ.
なんすかこれ...
passesかiterationsをいじればいいっぽいけど
数値計算のパラメタ調整とか中身知らないので本当に怖い.
model_lda = LdaModel(corpus=corpus, num_topics=30, id2word=corpus.id2word)
WARNING:gensim.models.ldamodel:too few updates, training might not converge; consider increasing the number of passes or iterations to improve accuracy
ソースコードを見てみる
問題はinit最後に実行されるupdateメソッド616行付近
if updates_per_pass * passes < 10:
    logger.warning("too few updates, training might not converge; consider "
                   "increasing the number of passes or iterations to improve accuracy")
passesは LdaModelのinitパラメタpassesをそのまま使ってる.
デフォルトで1が代入されている.
updates_per_pass... むむむ...
updateメソッド内_607行らへん
updates_per_pass = max(1, lencorpus / updateafter)
lencorpusはupdateメソッドの585行目付近で len(corpus)の値が代入されている.
要は文書数.この警告が出ている時の文章数は4019.
updateafter...
updateメソッド内_599行目あたり
if update_every:
    updatetype = "online"
    updateafter = min(lencorpus, update_every * self.numworkers * chunksize)
else:
    updatetype = "batch"
    updateafter = lencorpus
updateメソッドの引数指定が無いなら,
update_everyには,initパラメタupdate_everyと同じものが代入される.初期値は1.
updatetypeはonlineになる.
self.numworkersには,initパラメタdistributedがFalseのままなら1が入っている.
chunksizeは...
updateメソッド内_たぶん595行
chunksize = min(lencorpus, self.chunksize)
self.chunksizeはinitパラメタchunksizeとおなじ.デフォルトは2000.
つまり...
updateafter = min(4019, 112000) = 2000
updates_per_pass = max(1, 4019 / 2000) ≒ 2
で,ifの左の評価式は 2*1 になる.アウト.
対策は
・passesを増やす.今回の場合ではpasses=5で怒られなくなる.
・updateafterを小さくする=update_everyかchunksizeを小さくする.
_今回の場合でchunksizeだけを変えるなら400ぐらいにしたら怒られなくなる.
このパラメタについては疲れたので別の日に調べます.